nginxでリバースプロキシ その2。
昨日のnginxの話の続き。というか、実質的にはWSGIの設定がメイン。gitwebの動いているノードに、trac-gitを入れて動かす場合、tracdで動かしても良いかもしれないが、mod_python, FastCGI, WSGIのいずれかを使って、tracをApacheで動かしたいのが普通だろう。どれを選択すればよいのか?WSGIのDebianパッケージであるlibapache2-mod-wsgiのcontrolを見るとこんなことが書いてある。
The adapter provides significantly better performance than using existing WSGI adapters for mod_python or CGI.
意訳:mod_pythonやCGIなんて目じゃないぜ。
これはWSGIを使うしかないでしょ。ということで 1 、まず、libapache2-mod-wsgiをインストールする。
$ sudo apt-get install libapache2-mod-wsgi
インストールすると、便利なことに自動的にa2enmod wsgiも実行して、/etc/apache2/mod-enable/wsgi.{load,conf}を作成してくれるおまけ付き。気が利くね。wsgi.confの中身を見ると、全てコメントアウトされているが気にするな。全てデフォルト値が設定されている。とりあえず動かしてみることが重要なので、今は無視して構わん。
/etc/apache2/site-available/defaultの方の設定に移る。とりあえず認証が必要無ければ以下で良い。そうそう、エイリアスの”/trac”は”/trac/”じゃダメなので注意しよう。Directoryディレクティブのパスも最後に”/”を入れちゃダメだ。入れるとちゃんとリバースプロキシされなくなる。
WSGIScriptAlias /trac /var/cache/trac/trac.wsgi
<Directory /var/cache/trac>
        Order allow,deny
        Allow from all
</Directory>
/var/cache/trac/trac.wsgiには以下のコードを書いておく。
import os

os.environ['TRAC_ENV'] = '/var/cache/trac'
os.environ['PYTHON_EGG_CACHE'] = '/tmp'

import trac.web.main
application = trac.web.main.dispatch_request
認証が必要なら、ダイジェスト認証を設定しておこう。 2
<Directory /var/cache/trac>
        Order allow,deny
        Allow from all
        AuthType Digest
        AuthName "trac"
        AuthDigestDomain /var/cache/trac
        AuthUserFile /var/local/trac/.htpasswd
        Require valid-user
</Directory>
htdigestコマンドでユーザ、パスワードを設定しておく。Apacheはデフォルトではauth_digestモジュールは無効になっているので有効にしておく必要がある。
$ sudo a2enmod auth_digest
$ sudo mkdir /var/local/trac
$ sudo htdigest -c /var/local/trac/.htpasswd trac user
Adding password for user in realm trac.
New password:
Re-type new password:
Apacheを再起動したら、trac-gitのノードでの作業は終わりだ。
さて、一応本題のnginxでのリバースプロキシの設定はというと、実は非常に簡単。昨日のgitweb向けの設定を以下のように変更すればよい。ここでも注意が必要なのは、”/trac”や”http://git/trac”は、”/trac/”や”http://git/trac/”ではダメなので注意しよう。
upstream git {
        server 192.168.xxx.xxx;
}
server {
        listen   80;
        server_name git.hoge.org;
        location / {
                proxy_pass http://git/;
        }
        location /trac {
                proxy_pass http://git/trac;
        }
}
nginxを再起動すれば、リバースプロキシ経由でtrac-gitにアクセスできるようになる。
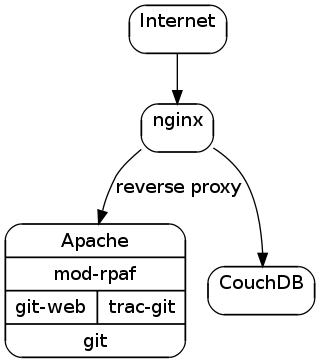
graphvizで描く。
昨日の図のソースは以下。
digraph structure {
node[shape="record",style="rounded"];
"Internet" -> "nginx";
"nginx" -> "Apache" [label="reverse proxy"];
"nginx" -> "CouchDB"
Apache [label = "{Apache|mod-rpaf|{git-web|trac-git}|git}"];
}
これをPNG形式で画像にすると。
$ dot -T png < lxc.dot > lxc.png
PNG形式よりも、EPSでLaTeXに埋め込む方が綺麗なんだけどね。
nginxでリバースプロキシ。
gitwebとCouchDBをバックエンドにしたリバースプロキシをnginxで設定したのでメモ。構成的には下図。各ノードはlxcのコンテナとして立てている。
nginx自体は、
$ sudo apt-get install nginx
のみでインストールできる。設定ファイルは、/etc/nginx/以下。Apacheのディレクトリ構成に似ている。Debianパッケージだからか。
リバースプロキシの設定は/etc/nginx/conf.d/ディレクトリ以下に、proxy.confとして設定。proxy_set_headerを指定して、バックエンドサーバに対してクライアントのIPアドレスを教える。
proxy_redirect                          off;
proxy_set_header Host                   $host;
proxy_set_header X-Real-IP              $remote_addr;
proxy_set_header X-Forwarded-Host       $host;
proxy_set_header X-Forwarded-Server     $host;
proxy_set_header X-Forwarded-For        $proxy_add_x_forwarded_for;
プロキシさせるのは、ApacheとCouchDBとでそれぞれ別のサブドメインを割り当ててネームベースのバーチャルホストを/etc/nginx/sites-available/defaultに設定。
server {
        listen   80;
        server_name  localhost;
        access_log  /var/log/nginx/localhost.access.log;
        location / {
                root   /var/www/nginx-default;
                index  index.html index.htm;
        }
        location /doc {
                root   /usr/share;
                autoindex on;
                allow 127.0.0.1;
                deny all;
        }
        location /images {
                root   /usr/share;
                autoindex on;
        }
        location /javascript {
                root   /usr/share;
                autoindex off;
        }
}
upstream git {
        server 192.168.xxx.xxx;
}
server {
        listen   80;
        server_name git.hoge.org;
        location / {
                proxy_pass http://git/;
        }
}
upstream couchdb {
        server 192.168.xxx.yyy:5984;
}
server {
        listen   80;
        server_name couchdb.hoge.org;
        location / {
                proxy_pass http://couchdb/;
        }
}
Apacheにはgitwebの設定。
<VirtualHost *:80>
        ServerAdmin webmaster@git.hoge.org
        ServerName  git.hoge.org
        DocumentRoot /usr/share/gitweb
        <Directory />
                Options None
                AllowOverride None
                Order Deny,Allow
                Deny from All
        </Directory>
        <Directory /usr/share/gitweb>
                Options None
                AllowOverride None
                Order allow,deny
                allow from all
        </Directory>
        ScriptAlias /cgi-bin/ /usr/lib/cgi-bin/
        <Directory "/usr/lib/cgi-bin">
                AllowOverride None
                Options ExecCGI +FollowSymLinks +SymLinksIfOwnerMatch
                Order allow,deny
                Allow from all
        </Directory>
(snip)
</VirtualHost>
これだけだとApacheのログにはnginxのノードのIPアドレスが記録されるので、リモートクライアントのIPアドレスが記録されるようにするため、mod-rpafを使う。インストールは以下。
$ sudo apt-get install libapache2-mod-rpaf
$ sudo a2enmod rpaf
Module rpaf already enabled
/etc/apache2/mods-available/rpaf.confの設定で、RPAFproxy_ipsの値を127.0.0.1からnginxのIPアドレスに変更する。
<IfModule mod_rpaf.c>
RPAFenable On
RPAFsethostname On
RPAFproxy_ips 192.168.xxx.zzz
</IfModule>
trac-gitはまだ設定してないが、リバースプロキシに関してはあまり変わらないだろう。CouchDB側の設定は特に無し。というか、CouchDBのログはどこを設定すればよいのだろうか。気が向いたら調べてみる。
vimでインクリメント。
知らなかった。数字にカーソルがあっているときに、コマンドモードでCtrl+aを押すと、数字がインクリメントされるなんて。しかもちゃんと桁も増やしてくれる。9の時に実行すると10になる。3桁の数字の時に、百の位にカーソルがあってもちゃんとインクリメントされる。デクリメントするには、Ctrl+x。0の時にデクリメントするとちゃんと-1になるよ。
おお、ビックリ。
no branchを使う。
gitでno branchを使うメリットがよく分からなかったのだが、以前のコミットでのファイルの中身をgit diffではなく、実際の内容を確認したいときに使えば便利なのかと思ったのでメモ。
ワーキングコピーを変更してコミット前の状態なら、git addでindexに登録していても、そうでなくてもgit stashで一時的に退避させてしまえば、最新のHEADの状態を確認できる。でも、以前のコミットの状態のファイルを確認するには、この方法が使えない。
最新のHEADでのhogeファイルの内容が以下で、
$ cat hoge
2010年  1月 19日 火曜日 02:07:44 UTC
2010年  1月 19日 火曜日 02:08:05 UTC
ひとつ前のコミットの状態を確認したいとする。
commit b2e3cd8f9b1555b35d96789ca21e71c176cfdbd3
Author: Adam Smith <adam@hoge.org>
Date:   Tue Jan 19 02:11:16 2010 +0000

    next date.

    Signed-off-by: Adam Smith <adam@hoge.org>

commit db168f3e25531cc25435bc0934bfda512029e41a
Author: Adam Smith <adam@hoge.org>
Date:   Tue Jan 19 02:07:54 2010 +0000

    date now.

    Signed-off-by: Adam Smith <adam@hoge.org>

commit 002b7a77b5e725ec713057c792c832cd518f26a9
Author: Adam Smith <adam@hoge.org>
Date:   Tue Jan 19 02:07:34 2010 +0000

    first commit.

    Signed-off-by: Adam Smith <adam@hoge.org>
コミットログでは、HEAD^(db168f3e25531cc25435bc0934bfda512029e41a)なので、
$ git checkout HEAD^
Note: moving to 'HEAD^' which isn't a local branch
If you want to create a new branch from this checkout, you may do so
(now or later) by using -b with the checkout command again. Example:
  git checkout -b <new_branch_name>
HEAD is now at db168f3... date now.
$ git branch
* (no branch)
  master
$ cat hoge
2010年  1月 19日 火曜日 02:07:44 UTC
元のmasterブランチに戻るには、git checkout masterを実行すればよし。
$ git checkout master
Previous HEAD position was db168f3... date now.
Switched to branch 'master'
$ git branch
* master
$ cat hoge
2010年  1月 19日 火曜日 02:07:44 UTC
2010年  1月 19日 火曜日 02:08:05 UTC
ワーキングコピーを変更していると、いきなりgit checkoutはできない。
$ date >> hoge
$ git status
# On branch master
# Changed but not updated:
#   (use "git add <file>..." to update what will be committed)
#   (use "git checkout -- <file>..." to discard changes in working directory)
#
#       modified:   hoge
#
no changes added to commit (use "git add" and/or "git commit -a")
$ git checkout HEAD^
error: You have local changes to 'hoge'; cannot switch branches.
git stashと組み合わせればOK。
$ git stash
Saved working directory and index state WIP on master: b2e3cd8 next date.
HEAD is now at b2e3cd8 next date.
$ git checkout HEAD^
Note: moving to 'HEAD^' which isn't a local branch
If you want to create a new branch from this checkout, you may do so
(now or later) by using -b with the checkout command again. Example:
  git checkout -b <new_branch_name>
HEAD is now at db168f3... date now.
$ git branch
* (no branch)
  master
$ cat hoge
2010年  1月 19日 火曜日 02:07:44 UTC
$ git checkout master
Previous HEAD position was db168f3... date now.
Switched to branch 'master'
$ git stash apply
# On branch master
# Changed but not updated:
#   (use "git add <file>..." to update what will be committed)
#   (use "git checkout -- <file>..." to discard changes in working directory)
#
#       modified:   hoge
#
no changes added to commit (use "git add" and/or "git commit -a")
$ cat hoge
2010年  1月 19日 火曜日 02:07:44 UTC
2010年  1月 19日 火曜日 02:08:05 UTC
2010年  1月 19日 火曜日 02:26:06 UTC
$ git stash drop
Dropped refs/stash@{0} (f840bc3523788121cf9d739b475e6c11c60cd966)